


Dr. Martens Women’s Sandals: Fit, Comfort & Care Tips

Dr. Martens Women’s Sandals: Fit, Comfort, Styling, and Care
Dr. Martens women’s sandals bring the brand’s signature toughness into warm-weather wear—think chunky soles, secure straps, and that familiar “gets better the more you wear it” feel. The key is choosing a style that matches how you actually walk, then dialing in fit so the break-in period stays manageable (and blister-free). Below is a practical guide to picking the right pair, making them comfortable for long days, and keeping them looking sharp season after season. For more guidance, see How to style your favourite Dr Martens sandals for summer.
What Sets These Sandals Apart
Dr. Martens sandals are built to take repeat wear. You’ll typically see sturdy uppers, supportive footbeds, and hardware-forward straps designed to stay put on the move.
- Recognizable silhouettes with durable materials and a more substantial feel than many fashion-only sandals.
- Platform and lug-sole options that add height and traction without switching back to boots.
- Buckles and wide straps that can feel more secure than minimalist slip-ons during long days.
- A break-in period is common; comfort usually improves with gradual wear as straps and footbed adapt.
Choosing the Right Style for Your Day-to-Day
The “best” style is the one that matches your routes, pace, and tolerance for weight. If you walk fast, commute, or travel, prioritize stability and heel hold over quick slip-on convenience.
| Style type | Best for | Fit notes | Trade-offs |
|---|---|---|---|
| Two-strap | Casual daily wear | Adjustable buckle improves lockdown | Less secure at high walking speeds |
| Caged/fisherman | Travel and long walks | More contact points for stability | Warmer on hot days |
| Platform | All-day outfits, extra cushioning | Consider sole stiffness and weight | Can feel bulky if unused to height |
| Ankle-strap | Narrow heels, active days | Prevents heel slip | More time to buckle on/off |
Fit and Sizing: Getting It Right the First Time
Sandals are less forgiving than sneakers: if length is off, your toes or heel will tell you quickly. Start with measurement, then fine-tune with strap placement and adjustability.
- Measure at the end of the day when feet are slightly more swollen; use the larger foot if they differ.
- Check footbed placement: heel centered (not hanging off), and toes not pressing the front edge when standing.
- Straps should secure, not pinch—especially over the instep, where heat-related swelling often shows up first.
- If between sizes, prioritize length first, then adjust volume with buckles, socks, or a thin insole.
- Expect a short break-in; straps that feel sharply painful or cause numbness usually won’t “stretch into comfort” without damage.
Quick fit checklist before keeping the pair
| Checkpoint | Good sign | Warning sign | Fix to try |
|---|---|---|---|
| Length | Toes have a little room | Toes touch/overhang edge | Try next size up |
| Heel placement | Heel centered, stable | Heel sliding off footbed | Tighten ankle/instep strap; add heel grip |
| Instep pressure | Snug, no numbness | Pinching, tingling | Loosen buckle; consider different strap layout |
| Walking test (5–10 min) | No hot spots | Rubbing on top strap/side | Moleskin; thicker socks; gradual break-in |
Comfort and Support for Long Walks
If your sandals are going to see city miles, comfort comes from a mix of footbed shape, mild forefoot flex, and straps that stop your foot from sliding around.
- Look for a contoured footbed and a sole that flexes slightly at the forefoot; overly stiff soles can fatigue arches.
- Platforms can add cushioning, but the extra weight may matter if you’re walking far—balance softness with how much you carry and how long you’re on your feet.
- For high-mileage days, choose secure heel hold (ankle strap or multi-strap designs) over pure slip-ons.
- Break in gradually: start with 30–60 minutes indoors and add time over several wears.
- Use blister prevention early: moleskin or hydrocolloid bandages on known hot spots; avoid brand-new sandals for all-day events.
For general fit and comfort principles, the American Podiatric Medical Association (APMA) footwear guidance is a helpful reference point when assessing support and everyday wear habits.
Materials, Durability, and Care
Material choice affects break-in, upkeep, and how the sandals age. Leather tends to mold to your foot, while coated or synthetic finishes can be easier to wipe down but may be less forgiving if straps hit a sensitive spot.
For brand-specific upkeep, use Dr. Martens’ official guidance: Dr. Martens Product Care Guides.
Outfit Ideas: From Minimal to Bold
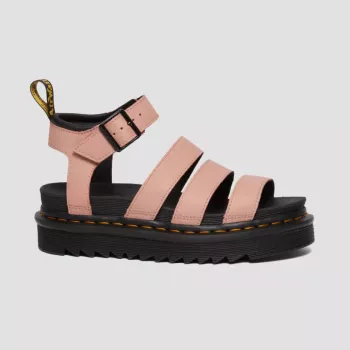
Featured Pick: Dr. Martens Women’s Pink Sandals
Product snapshot
| Item | Price | Availability | Link |
|---|---|---|---|
| Dr. Martens Women’s Pink Sandals | $57.01 | In stock | View product |
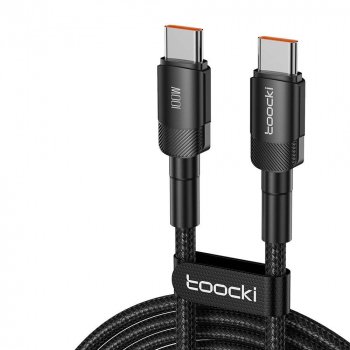
Extra In-Stock Travel Helpers (Optional)
- Cotton Sleeping Bag Liner for cleaner, more comfortable overnight stays.
- 100W USB-C to USB-C Fast Charging Cable with PD 3.0 & QC 4.0 – 5A Power to keep devices topped up on the go.
Common Buying Pitfalls to Avoid
FAQ
Do Dr. Martens women’s sandals run true to size?
Fit can vary by style and foot shape, so measuring and checking heel/toe placement on the footbed is more reliable than going by your usual sneaker size. If you’re between sizes, prioritize length first and use buckle adjustability (or thin socks/insoles) to fine-tune volume.
How can blisters be prevented during the break-in period?
Start with short indoor wears and increase time gradually, using moleskin or hydrocolloid bandages on known hot spots before irritation starts. Keep straps snug but not tight, and avoid making brand-new sandals your first all-day pair.
How should leather sandals be cleaned and cared for?
Wipe them down after wear, spot-clean with a damp cloth, and let them air-dry away from direct heat. Condition leather occasionally to reduce drying, and store out of direct sunlight to help prevent fading and cracking.


Leave a comment